We recently developed a Canvas app for one of our clients to facilitate QR code scanning during events. The requirement was to print labels for batches of attendees after each scan. Since we couldn’t directly connect the scanning device to a printer, we opted for a cloud printing solution.
To enable printing functionality, we selected the Zebra ZD421 Label printer. This printer comes equipped with a built-in print server that connects to Zebra’s cloud service. To interact with the cloud printing API, we leveraged Power Automate. Unfortunately, we couldn’t utilize a custom connector due to PowerFX’s lack of support for base64 conversion.
Ingredients
-
- Zebra ZD421 Label Printer, connected to internet
- Cloud registration and plans on https://developer.zebra.com/
- Create label template
- Power Automate Flow call to Zebra API (Savanne)
- Canvas app calling Power Automate Flow
Steps
1 – Connect label printer to Internet
Buying your own label printer is the easy part. Connecting it to internet is the difficult one. Using the Zebra configuration tool all technical internet settings are send as configuration file to the Zebra printer and, with luck, you Zebra printer network icon will glow green.
2 – Cloud registration
Registration to the developer cloud is free (https://developer.zebra.com ). From there you can choose and buy plans to your needs. We use the SendToPrinter (Free) plan, which you may use up to 100 calls per day. If that is not enough, a pay per use plan is also possible.
You also have to select the Zebra Sananne Base Platform API plan for communicating with the printer.
After selecting the plans, you may register your app in the same environment. Select both plans within your app and save App ID and Tenant ID.
Finally you have to register your device. Select Add device and follow the specific steps that are mentioned there. Again a setup file with information about your cloud is send to the printer. Write down the serial of the printer for use in the API.
Zebra provides two API’s, where the staging API may be used for testing purposes. It works just like the production API, without printing te label:
-
- https://api.zebra.com/v2/devices/printers/send
-
- https://stage-api.zebra.com/v2/devices/printers/send
3 – Create label template
Zebra is using the ZPL protocol to print labels. Labels may be deigned with the free design tool form Zebra (https://www.zebra.com/gb/en/support-downloads/printer-software/zebra-designer-3-downloads.html ). I use the text {{name}} (for example) to indicate the variables that has to be changed when creating a label.
Please be aware that if you choose another font then the default Zebra fonts, we cannot search and replace the variables anymore. Texts in these fonts are binary included in the ZPL file.
3 – Power Automate call to Zebra API
Within Power Automate you may call the Zebra API. This can be done by creating a custom connector, or directly from the HTTP action. I used the last one. The Zebra API uses the PI key, Tenant number, Serial number of the printer and the ZPL file (text file).
We need to do a few steps to create the text file:
Convert the text of the ZPL file to base64:
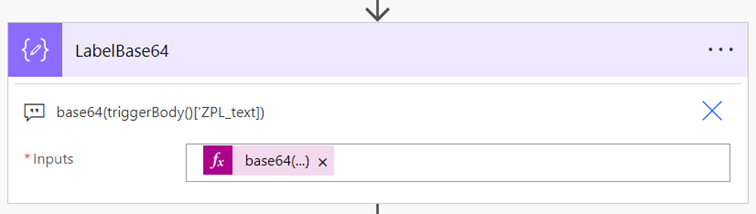
And include the bas64 string in a multi-art message to the API of Zebra. This step is a bit tricky, but should work in other environments as well:
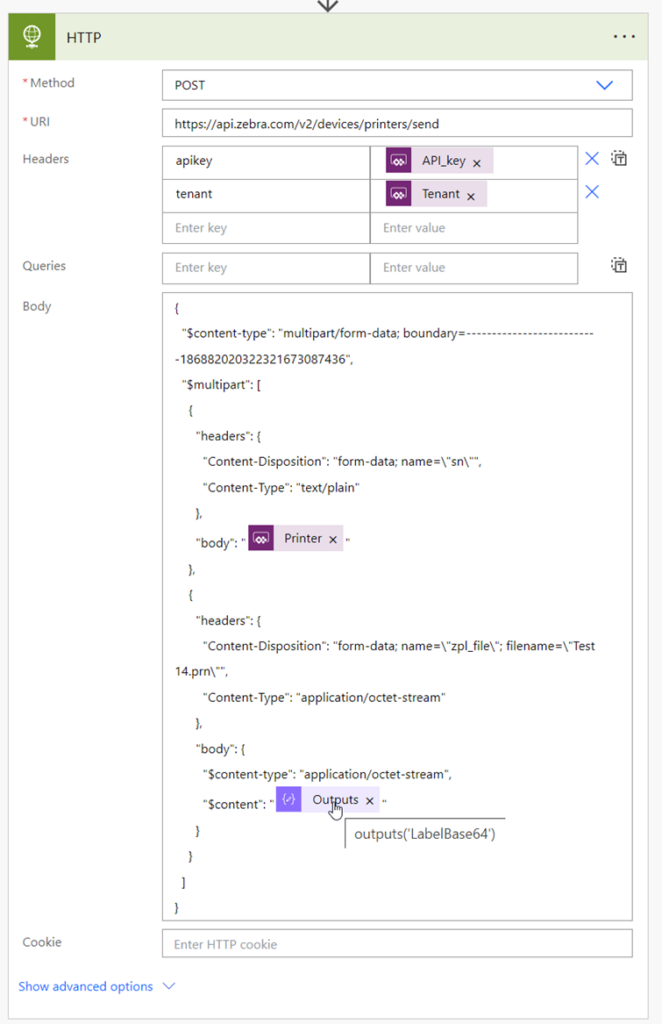
Part of the body are both two form fields:
-
- sn: Serial number of the printer
-
- zpl_file: Filename and contents (base64) of the ZPL text file
The body will be:
{
  "$content-type": "multipart/form-data; boundary=--------------------------186882020322321673087436",
  "$multipart": [
    {
      "headers": {
        "Content-Disposition": "form-data; name=\"sn\"",
        "Content-Type": "text/plain"
      },
      "body": "@{triggerBody()['printer_serial']}"
    },
    {
      "headers": {
        "Content-Disposition": "form-data; name=\"zpl_file\"; filename=\"Test 14.prn\"",
        "Content-Type": "application/octet-stream"
      },
      "body": {
        "$content-type": "application/octet-stream",
        "$content": "@{outputs('LabelBase64')}"
      }
    }
  ]
}
5. Canvas app calling the flow
The canvas app has to suit your own needs, of course. However, to replace the variables with the needed text, I use the following code:

Finally
I hope this document saves you all the research I needed to build this all! At the end we have a nice app that prints labels in about 2 seconds. Really great!
If you have any suggestions or questioins, pleas contact me on elowy@grootcrm.nl
