One of my clients inquired about the possibility of transferring their generated Facebook leads to Dynamics 365 Sales by using Power Automate. Up to this point, they had been utilizing Zapier, which offers a custom integration for both Dynamics 365 and Facebook leads. That works well, but costs a monthly fee.
With an API connection available and a Facebook’s Leadgen webhook, I initially thought this project would be straightforward, estimating my time at 4 to 8 hours…
However, the reality proved to be far from straightforward. In fact, it was a daunting challenge. I now understand why there are numerous integration tools available to facilitate this process. Even though the API documentation is comprehensive, it’s challenging to piece together the entire process and follow the steps in the correct sequence.
Just when I was on the verge of giving up, I stumbled upon a helpful blog post (many thanks to Elad Nava) that guided me through the final stages.
I share this experience in the hope that it will assist fellow Power Automate consultants in successfully integrating Facebook leads.
Ingredients
- Set up a Facebook app
- Establish the initial part of the Power Automate flow
- Register the Leadgen webhook
- Generate a lead form (for testing purposes)
- Obtain a page token
- Link your application to the Facebook page
- Conduct a test
- Create the second part of the Power Automate flow
Step 1: Set up a Facebook app
The webhook service needs to be associated with a Facebook App. This App should be established through a developer account. Once created, your App needs to be set to live if you intend to use it with real leads.
To create a developer account, log in using your Facebook credentials at: https://developers.facebook.com/
You can find and create ‘apps’ at: https://developers.facebook.com/apps/
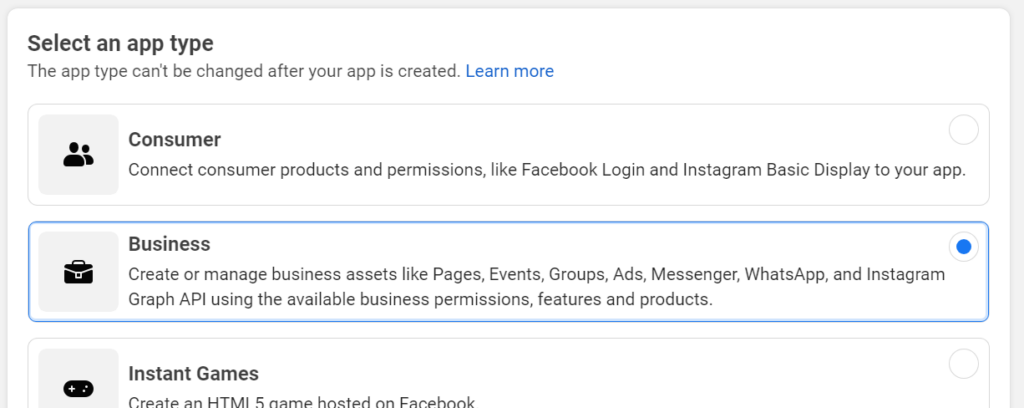
When creating an ‘app,’ select ‘Other’ and ‘Business’ as the category.”

Step 2: Establish the initial part of the Power Automate flow.
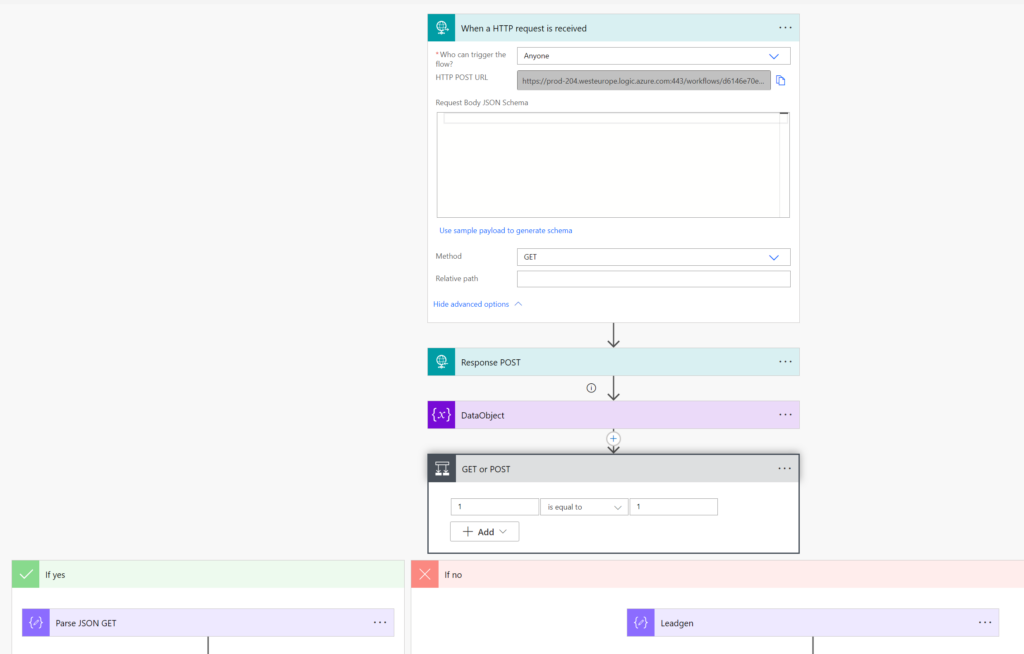
The task involves setting up a Power Automate flow capable of managing both GET and POST requests. The GET request is specifically for registering the webhook, while the POST request is for handling Leadgen webhook data.
This can be accomplished by initiating a ‘When a HTTP request is received’ action with the GET method to register the webhook with Facebook. Afterward, switch the action to a POST request for data reception.
Here’s the process I followed:”
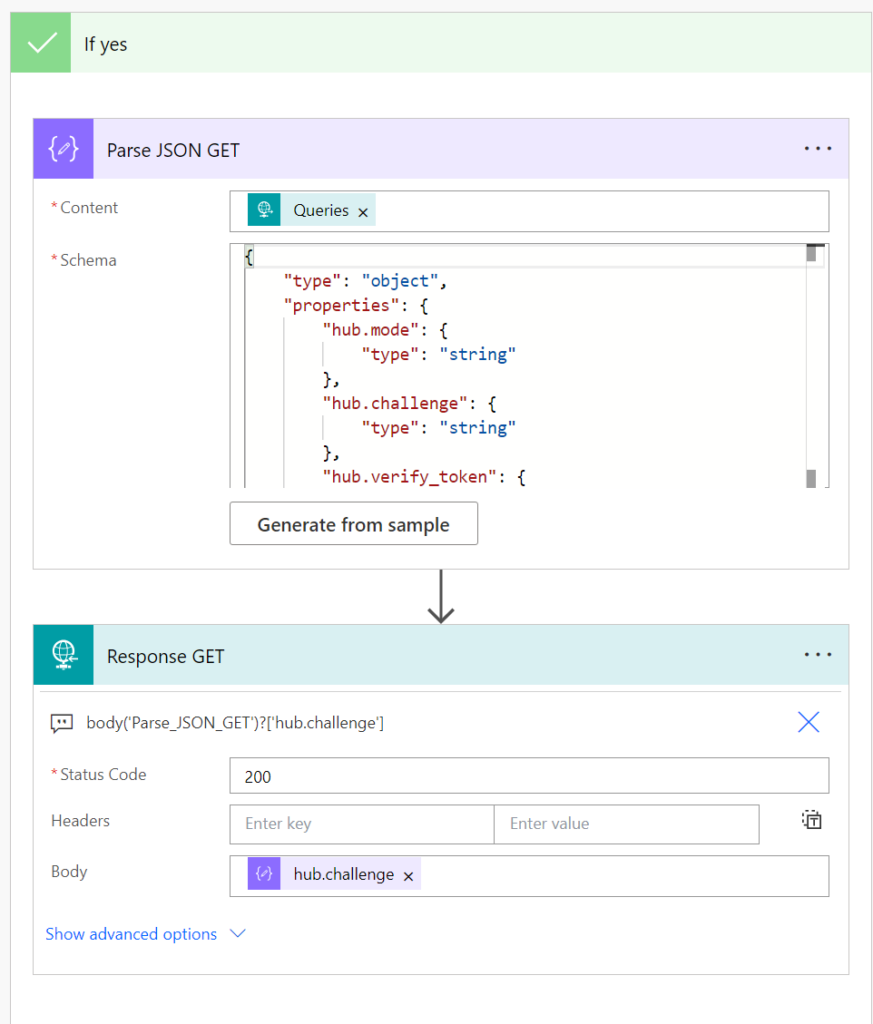
For registration purposes, the flow has to return the hub.challenge property that is send with the GET method:
Step 3: Register the Leadgen webhook
Copy the HTTP request URL from the Power Automate flow, then return to Facebook to complete the webhook registration process. Choose ‘Page’ from the dropdown menu and click on ‘Subscribe to this object’

This is where you may paste the HTTP request URL and a ‘whatever’ token:

Choose ‘Verify and save’. Next, locate the Webhook Leadgen and select ‘subscribe’. That concludes this step!
If you wish to test the connection, you can click on the ‘Test’ button. However, remember to set the Power Automate flow back to POST before doing so:”

The following test data is being send from Facebook to the webhook:
{
  "entry": [
    {
      "id": "0",
      "time": 1697224098,
      "changes": [
        {
          "field": "Leadgen",
          "value": {
            "ad_id": "444444444",
            "form_id": "444444444444",
            "Leadgen_id": "444444444444",
            "created_time": 1697224098,
            "page_id": "444444444444",
            "adgroup_id": "44444444444"
          }
        }
      ]
    }
  ],
  "object": "page"
}
You can use this data as input to generate a data scheme for a Parse data action:
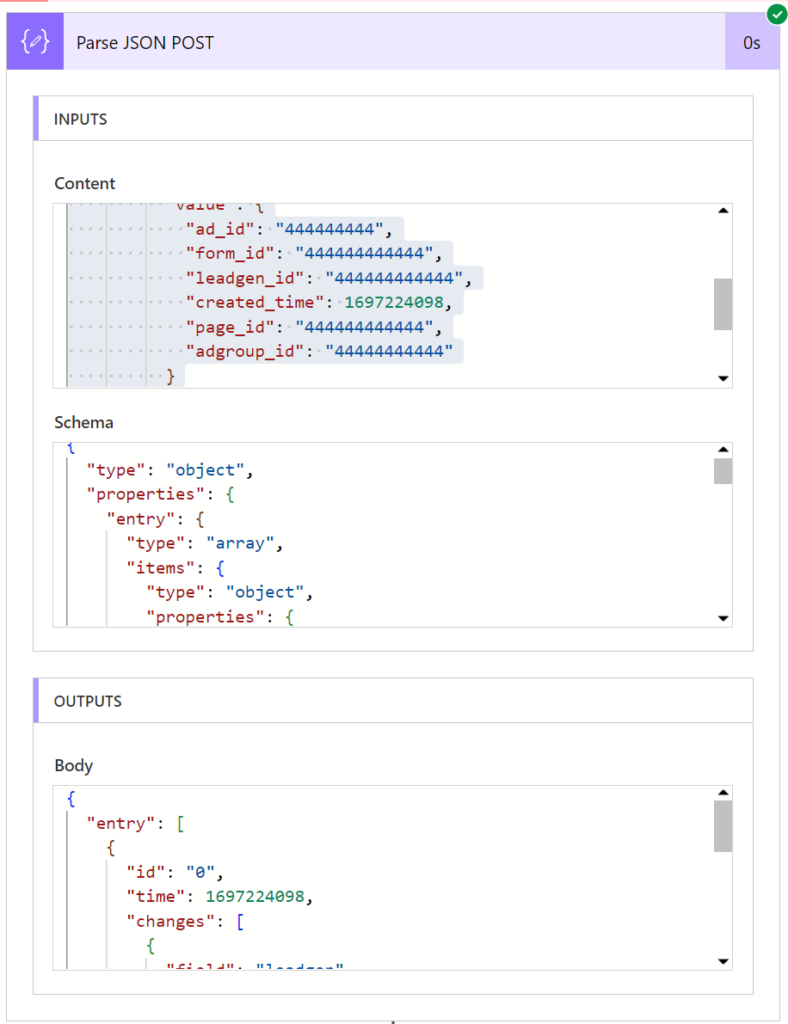
So that’s everything we need to add to the app for now. Please set the app to live if you want to use more than only test leads:

Step 4: Generate a lead form
To generate a lead form that we can use for testing purposes, follow this link: https://business.facebook.com/latest/instant_forms/forms
Step 5: Obtain a page token
In the following steps, we’ll utilize a page permission token to establish a connection between the app and the page, as well as to fetch leads within the Power Automate flow. This token has a limited validity period, so we’ll regenerate it to obtain a long-lasting access token after creation.
You can carry out all subsequent steps using the Facebook Graph API Explorer: https://developers.facebook.com/tools/explorer/
Choose ‘App’, ‘User’, and grant the following permissions to access Facebook Ads Leads:
- pages_show_list
- ads_management
- ads_read
- leads_retrieval
- pages_read_engagement
- pages_manage_metadata
- pages_manage_ads
Click on ‘Generate token’. Here, you’ll be prompted to select your Page.
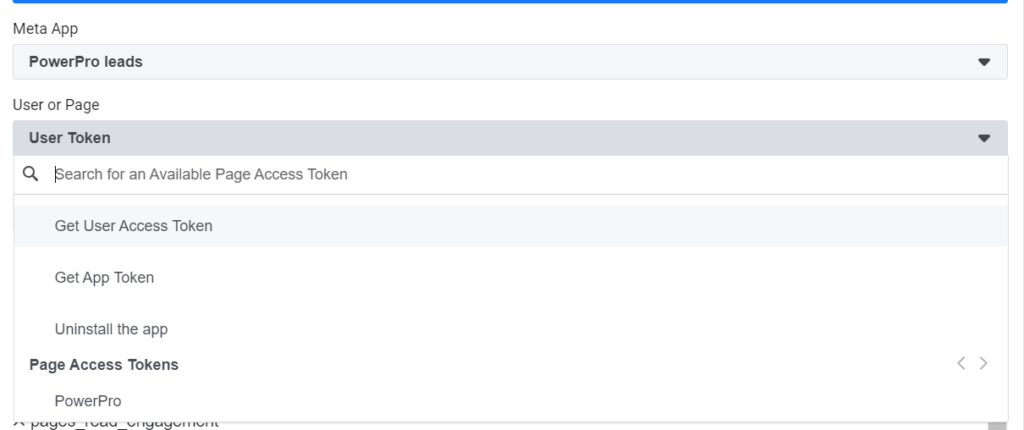
Choose the Page and proceed to generate a token once more. This token will now be specific to the chosen Page. Copy it, as we’ll need to extend its validity using the Access Token Debug Tool: https://developers.Facebook.com/tools/debug/accesstoken/
Navigate to ‘Debug’ and select ‘Extend Access Token’ at the end of the information. Prior to extending, please ensure this is indeed a Page access token.

Copy and securely store the extended token. We’ll use it in the flow to retrieve leads, and it will also play a role in the next step.
Additionally, make note of the App ID and Page ID from this overview. We’ll be using them in the upcoming steps to establish the connection between them.”
Step 6: Link your application to the Facebook page
Connecting the app with the Facebook page will be done through the Graph API explorer once more. To link the app with the page, insert the (extended) page token and send both the app id and page id to the Graph API. This is a POST to /<page-id>/subscribed_apps with parameter subscribed_fields=leadgen.

Step 7: Conduct a test
Now, everything should be set up, and we’re ready to test the connection and webhook! Facebook provides a useful testing tool at: https://developers.Facebook.com/tools/lead-ads-testing. In this tool, you can select the page and test form, and create a lead.

Step 8: Create the second part of the Power Automate flow
Assuming all setup steps were successful, the first call to the webhook has been made! Within the recently executed flow, you’ll find the message body of the webhook. You can utilize this body as input to generate a JSON schema for parsing the content, as mentioned earlier.
The Leadgen_id can be located as part of the message:
body('Leadgen')?['entry']?[0]?['changes']?[0]?['value']?['Leadgen_id']With this Leadgen_id and the saved token (ensure it’s stored securely, like in an environment variable), we can retrieve the contents of the lead. You may utilize a user token as well if you have receive leads from multiple pages. Select the user token in the “Create a token” step and extend it using the token debug tool.
The extended page token is inserted after the Bearer token. To retrieve the lead, simply append the Leadgen_id to the API URL, like: https://graph.Facebook.com/v18.0/<Leadgen_id>
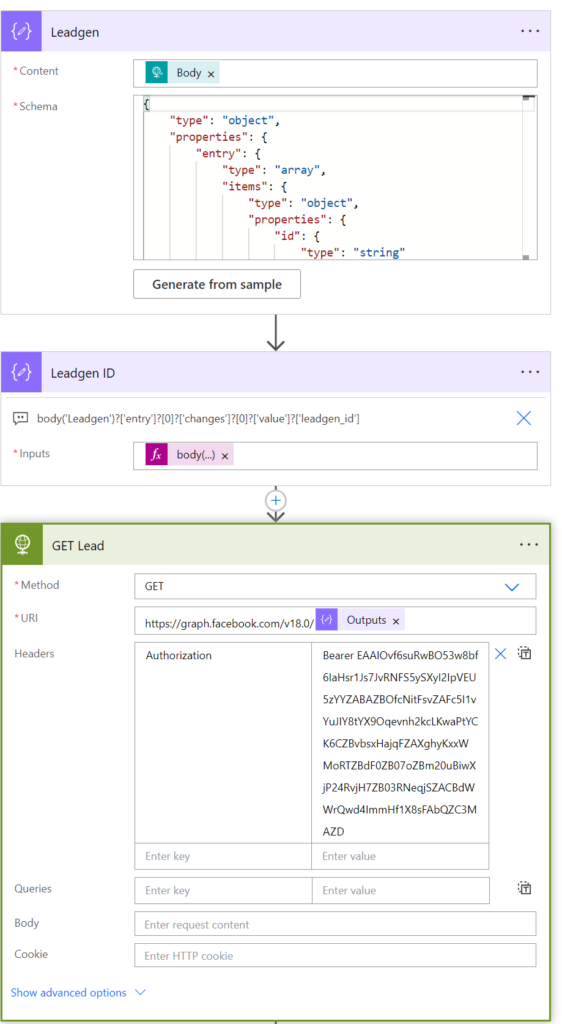
Finally, we’ll obtain the form fields of the submitted lead! It will look something like this:
{
  "created_time": "2023-10-26T12:41:24+0000",
  "id": "6829390000000000",
  "field_data": [
    {
      "name": "When_do_you_want_to_go?",
      "values": [
        "<test lead: dummy data for When do you want to go?>"
      ]
    },
    {
      "name": "email",
      "values": [
        "test@fb.com"
      ]
    },
    {
      "name": "full_name",
      "values": [
        "<test lead: dummy data for full_name>"
      ]
    }
  ]
}
Personally, I prefer to convert this form field data into an object. The method for doing so can be found in another blog post. Once converted, it will look like:
{
  "when_do_you_want_to_go?": "nu",
  "email": "Facebook@elowy.net",
  "full_name": "Elowy Groot",
  "End": "End"
}
Finally, this data can be used to generate a lead!
You can also test it by selecting ‘Test Form’ from the form preview in the form tool at: https://business.facebook.com/latest/instant_forms/forms/.
Kindly notify me via email if there are any inaccuracies or areas that could be enhanced: elowy@powerpro.nl
Resources:
Facebook tools:
- Check user permissions: https://business.Facebook.com/latest/settings/business_users
- Set lead access to user: https://business.Facebook.com/latest/settings/leads_access
- Check page permissions: https://business.Facebook.com/latest/settings/pages
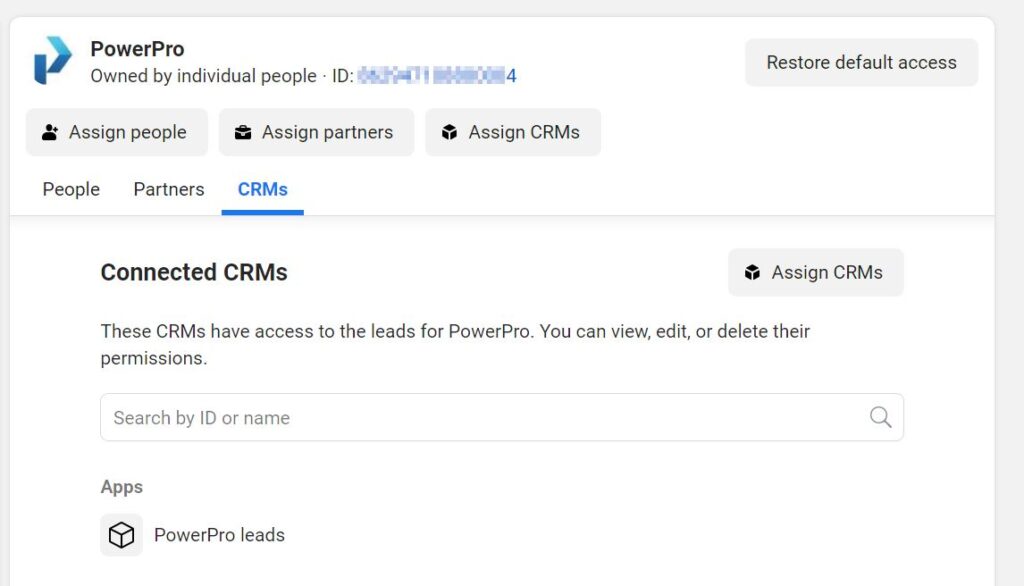
- Check whether app is connected to page: https://business.Facebook.com/latest/instant_forms/crm_setup
- Leads center: https://business.Facebook.com/latest/leads_center
- Lead Ads testing tool: https://developers.Facebook.com/tools/lead-ads-testing
- Graph API explorer: https://developers.Facebook.com/tools/explorer/
- Facebook Forms: https://business.Facebook.com/latest/instant_forms/forms/
- Minimal read permission: https://developers.facebook.com/docs/marketing-api/guides/lead-ads/retrieving/

